

Baked Thin Chicken Breast- aka versatile meal prep chicken!
This baked thin chicken breast is my go-to when I want a delicious, easy protein that works in just about anything. It cooks in just 10 minutes and gives you tender, juicy chicken every time, whether you’re meal-prepping for the week or making dinner for the family. Toss it into salads, casseroles, quesadillas or wraps, or enjoy it straight up with a few sides. With a simple spice mix and minimal prep, these baked thin chicken breasts will quickly become a staple in your kitchen.

FEATURED COMMENT
“This chicken is AMAZING!!! Me and chicken rarely get along because I often overcook it and then it’s rubbery. Not this time! I will never not broil chicken. I shared this recipe with 6+ people and everyone was equally pleased. I also seasoned it differently the third time I made it and then cooked the same, fool proof. I’m hooked. Thank you, Erica!!!”
★★★★★

No dry, overcooked chicken here.
One thing I’m always trying to do is create more recipes where I can ‘cook once, eat twice’. And I’m not talking about cooking and then eating leftovers. I’m a slight diva and while I can absolutely get behind leftovers, I generally like a different dinner each evening.
So when I say ‘cook once eat twice’, I’m thinking about a meal where I can cook a primary component (usually a protein source) and then use that protein to make two (or more) totally different meals.
As easy as a rotisserie chicken is, I am quite picky and often find the texture off-putting and the flavor rather bland. Unless it’s a Costco rotisserie chicken, those are pretty good. But, in the pursuit of saving money and maximizing flavor, I decided to make us a really good, really simple baked chicken breast recipe. I love grilling chicken for meal prep in the summer, but in the dead of winter in Oregon, that just ain’t an option.
A few things about this chicken:
- We slice it in half lengthwise. This helps the chicken cook quickly and evenly without drying out.
- A bit of cornstarch and brown sugar in the seasoning mix. The cornstarch helps the seasoning really adhere to the chicken – too often the seasonings slip and slide right off! And the brown sugar promotes browning and caramelization and offsets the savory spices.
- Broil baby. I’ve found that hot and fast results in the best baked chicken. I tested this recipe quite a few times and while I offer both broil and bake instructions, I prefer the broil cooking method.
Keep your eyes peeled for more ideas on how to use this easy chicken recipe!

What You’ll Need to Make Baked Thin Chicken Breast:
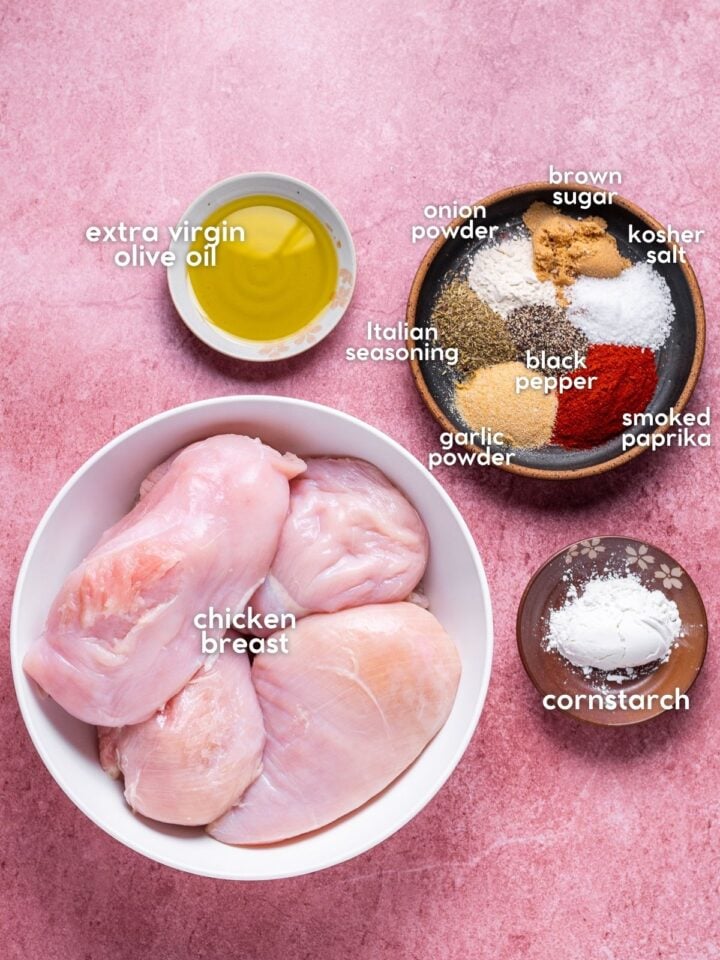
- Chicken breast: I like to buy the organic boneless skinless chicken breasts from Costco, but you can grab them at any grocery store. You’ll need 4 large chicken breasts (about 2 – 2 ½ pounds).
- Extra virgin olive oil: You only need a little to help the seasonings stick and keep the chicken juicy. Avocado oil or another neutral cooking oil you have on hand works too.
- Seasonings: Smoked paprika, garlic powder, onion powder, Italian seasoning, kosher salt and black pepper give the chicken plenty of flavor without taking it in one specific direction, which is exactly what we want for meal prep. I don’t recommend substituting fresh garlic as it will burn while it cooks. Regular or sweet paprika works if you don’t want the smoky flavor.
- Brown sugar: Adds a touch of sweetness. balances all those savory spices and helps the outside of the chicken caramelize.
- Cornstarch: Helps remove surface moisture so the seasoning stays put and gives the edges a slightly crispy texture.
How to Make Baked Thin Chicken Breast:
Preheat the oven to broil. Line a large rimmed baking sheet with a silicone baking mat or aluminum foil to prevent sticking and make cleanup easier. If necessary, prepare two baking sheets to avoid overcrowding. In a small bowl, combine paprika, brown sugar, garlic powder, onion powder, Italian seasoning, kosher salt, black pepper, and cornstarch.
Note: I do not recommend using parchment paper as it will burn under the broiler.


Pat the chicken dry with paper towels. Trim away any excess skin or sinew.


Using a sharp chef’s knife, slice each chicken breast in half lengthwise on a large cutting board to create thin, even chicken cutlets.


Drizzle olive oil over the fillets and sprinkle on the seasoning mix, tossing until the chicken is evenly coated.


Arrange the thin-sliced chicken breasts on the prepared baking sheet with at least one inch between each piece.


Broil for 5 minutes, then flip the chicken using tongs. Broil for an additional 5-8 minutes, depending on the thickness of the pieces. Use an instant-read meat thermometer to check that the internal temperature reaches 165°F.


Let the chicken rest for 5 minutes before cutting into thin slices, shredding or serving as is.


Dry chicken be gone! It’s Cook Once Eat Twice, and we’re making meals with lean protein that actually tastes GOOD.
Serving ideas for this oven-baked chicken breast:
- Mason Jar Salads: Layer with greens, grains, and veggies for an easy grab-and-go lunch.
- Flatbread: Make this yummy buffalo chicken flatbread or top any whole grain naan with chicken and toppings of choice.
- Wraps: Try a honey mustard chicken wrap or hummus chicken wrap with sun-dried tomato pesto for a filling, high protein meal.
- Chicken Salad: Use a stand mixer to shred the chicken and make BLT chicken salad.
- Pasta Dishes: Toss into a creamy pasta alfredo for your next date night, chili garlic pasta for a little heat, or a broccoli and chicken pasta bake for an easy family dinner.
- Side of Veggies: Serve it with a simple veggie side like green beans, roasted carrots, or balsamic asparagus. For something a little more cozy, try roasted Brussels sprouts or honey roasted vegetables. For a fresh option, try a big kale and spinach salad, little gem salad, or cucumber edamame salad.


Expert Tips:
- Check the thickness: Thinner fillets cook faster and more evenly, so aim for pieces that are a similar size from end to end, especially at the thickest part.
- Use a thermometer: For perfectly cooked chicken, use an instant read thermometer to avoid undercooking or drying it out.
- Avoid overcrowding: Leave space between the fillets to ensure even cooking and a slight crisp on the edges.
- Rest: Allowing the chicken to rest helps retain its juices for maximum flavor and tenderness.
- High heat: For best results, cook the chicken hot and fast (aka broil). All ovens are different though, so keep an eye on your broiler.
Variation Ideas:
- Spicy Kick: Add ½ teaspoon of cayenne pepper or a pinch of red pepper flakes to the seasoning mix.
- Citrus Twist: Squeeze fresh lemon juice, lime juice or lemon zest over the chicken after baking.
- Herbaceous Flavor: Add fresh herbs like thyme, oregano, rosemary, or parsley before serving.
- Grill it: If it’s grilling season, grill these chicken breast fillets for 4-5 minutes per side.
- Garnishes: Sprinkle with Parmesan cheese, balsamic glaze, red pepper flakes or flaky sea salt for a finishing touch!
FAQs
Store leftover chicken breast in an airtight container in the refrigerator for up to 3-4 days. Reheat gently in the microwave or for 1-2 minutes or in an air fryer to avoid drying out.
Absolutely! If it were me, I would shred or cube the cooked chicken breast and either vacuum seal or seal it tightly in a gallon Ziploc bag with all of the air sucked out. Store for up to 3 months and thaw in the fridge.
No, I tested the recipe both with and without cornstarch. The cornstarch helps the seasonings adhere to the chicken, helps lock in moisture and flavor and creates a little bit of extra crispiness around the edges. I prefer the chicken with the cornstarch, but it’s still yummy without.
Yes. I have both air fryer and bake instructions in the recipe card.
Yes. No need to slice in half as these are already pretty thin. They may need 1-2 fewer minutes in the oven.
Watch How to Make this Thin Chicken Breast Recipe:
If you try and like this recipe, please don’t forget to leave a comment and star rating down below! For more lifestyle, behind-the-scenes and ‘eating in real life’ type of content, come find me over on Instagram, TikTok, Pinterest, Facebook, or Youtube – I love connecting with you all there!
Print
Baked Thin Chicken Breasts- aka versatile meal prep chicken!
- Prep Time: 10 minutes
- Cook Time: 10 minutes
- Total Time: 20 minutes
- Yield: 8 servings
- Category: Meal Prep
- Method: Broil
- Cuisine: American
- Diet: High-Protein
Description
Juicy and flavorful, this oven baked thin chicken breast is your versatile chicken BFF- perfect for salads, pasta, wraps and more.
Ingredients
- 2–2½lb chicken breast, about 4 large chicken breasts, sliced in half lengthwise
- 1 tablespoon extra virgin olive oil
- 2 teaspoons brown sugar
- 1 tablespoon smoked paprika
- 1 ½ teaspoons garlic powder
- 1 ½ teaspoons onion powder
- 1 teaspoon Italian seasoning
- 1 ½ teaspoon kosher salt
- 1 teaspoon black pepper
- 1 tablespoon cornstarch
Instructions
- Preheat the oven to broil. Arrange the oven tray to the top third of the oven (not the highest notch, usually the second one down). Line a large rimmed baking sheet with a silicone baking mat or foil. You may need to use two baking sheets.
- In a small bowl, mix together 2 teaspoons brown sugar, 1 tablespoon paprika, 1 ½ teaspoons garlic powder, 1 ½ teaspoons onion powder, 1 teaspoon Italian seasoning, 1 ½ teaspoon kosher salt, 1 teaspoon black pepper and 1 tablespoon cornstarch.
- Pat the chicken dry with a paper towel. Trim away any excess skin or sinew. Using a chef’s knife, slice the chicken breast in half lengthwise so they are thin fillets. Do your best to cut them to an even thickness, about 1/2-inch. Drizzle the chicken with 1 tablespoon olive oil and sprinkle on the seasoning mixture, tossing the chicken until it is evenly coated.
- Place the chicken pieces on the prepared baking sheet, with at least 1 inch between each piece. Broil for 5 minutes. Flip the chicken using tongs and return to the oven. For small, thin pieces, broil another 5 minutes, for thicker pieces you may need 6-8 minutes. The chicken is done when it is golden brown and reaches an internal temperature of 165°F.
- Let chicken rest for 5 minutes and then slice or shred or enjoy as is!
This is my go-to meal prep chicken and I love to use it in mason jar salads, this easy chicken and pasta bake, BLT chicken salad, flatbreads, wraps, or sandwiches.
Notes
Oven bake instructions: Preheat oven to 425°F. Bake for 9 minutes, flip the fillets and bake an additional 4-6 minutes, until the internal temperature reaches 165°F.
Air fryer instructions: Arrange chicken pieces in a single layer in the basket of an air fryer. You will need to work in 2-3 batches so you don’t overcrowd the basket. You want space between each chicken piece. Air fry at 410°F for 10 minutes, adding another 2-3 minutes if you have thicker slices, until the internal temperature is 165°F.
Refer to above blog post for ingredient notes, step-by-step instructions, expert tips, variations and answers to frequently asked questions.
Would you like to save this?
Nutrition
- Serving Size: 1/8 recipe (3oz cooked chicken)
- Calories: 165
- Sugar: 0.9 g
- Sodium: 285.2 mg
- Fat: 4.9 g
- Carbohydrates: 3.2 g
- Fiber: 0.6 g
- Protein: 25.8 g
- Cholesterol: 82.7 mg
If you love this flavorful chicken, try these recipes:
Pesto Chicken Breast with Tortellini Caprese Salad
Balsamic Grilled Chicken turned into Chicken Pesto Sliders


I was skeptical about broiling it…but the chicken came out great! Amazing flavor and texture! We made Cobb salads tonight…and idk if there will be leftovers..lol!
Amazing!! So glad to hear it Brandie! Thanks for making the recipe 🙂 Cobb salads sound amazing.
The seasoning was delicious! But the chicken was rubbery and tough. I broiled it as directed. Any thoughts on what I might do differently? I appreciate any suggestions.
Hmmm, did you pat away all of the moisture from the chicken before adding the seasonings and olive oil? Sometimes when there is a lot of moisture on proteins they can ‘steam’ in the oven instead of roast and that can make the chicken rubbery. It’s also possible that your oven runs hot and you may need a few less minutes in the oven.
This is my new favorite way to make chicken in the oven! It comes out super juicy, flavorful, and requires little prep. Although it seems easy enough, chicken dries out fast in the oven if it prepared incorrectly, but this one is perfect! Erica has done it again!!
Love it Katelin, thank you so much for trying it and for your helpful review!
I don’t ever comment, but this recipe is so delicious. The seasoning blend is powerful and yet the prep and cooking was so easy! Amazing!
I LOVE when a silent lurker comments, hahahaha! As a former silent lurker, I appreciate you! Thanks for making the recipe 🙂
Erica has done it again! This recipe blew my mind and is a game changer. So easy and quick. My kids loved it too!
Woohoooo! Love to hear this Michelle, so glad the fam loved it!
This chicken is AMAZING!!! Me and chicken rarely get along because I often overcook it and then it’s rubbery. Not this time! I will never not broil chicken. I shared this recipe with 6+ people and everyone was equally pleased. I also seasoned it differently the third time I made it and then cooked the same, fool proof. I’m hooked. Thank you, Erica!!!
Wooohooooo! Nothing like a good chicken win! Thanks for your review Lizzy 🙂
I tried this tonight for taco night and it was delish! I squeezed a bit of lime over it after it was done baking. This will definitely become a staple-thanks for sharing!
Love this chicken recipe! I have made it several times for dinner and my teen daughter loves snacking on the leftovers when she comes home from school. I have also sliced it up for naan wraps for her lunch box, adding sliced veggies and hummus and/or guacamole. My grocery store sells thinly sliced chicken breasts, so I use those for a shortcut. My oven has one of those lower broiler drawers, and food is kind of hard to get in and out, so I have followed the directions for baking them in the oven and they turn out great. So easy and so yummy!
My husband and I have struggled to make chicken. This recipe is so easy and the chicken was so moist and not dry at all – wonderful! We will continue to make chicken this way! Thank you!
WOot woot! Stoked to hear this Brittany, thank you!
I’m currently eating this chicken for lunch right now… had to hop on here while I’m eating to leave a review. It’s crazy good, guys! I made this last night with the intention of using it for the week for work lunches. Let’s just say my family DEVOURED what I had prepped, but I did manage to get one portion for lunch today. Fresh out of the oven, the chicken was incredibly flavorful and juicy. Reheated the next day it is just as good! It doesn’t have the “reheated” chicken taste! My husband is at home thawing another 4 chicken breast so we can make another batch tonight. 12/10. Make this. Thanks for another awesome recipe, Erica!
Me again… forgot to mention that my 12 year old daughter LOVED it, and she is on the verge of being a vegetarian. She is not a meat girlie at all… guess what? She crushed this and asked for it again!
This is the best chicken I’ve ever made!!
Yassssss!! I mean, honestly same 🙂
Looks good but the seasonings mixture is way too little for 2.5lbs of sliced Chx breast. I had to go back and more than double amounts. Barely coats. Letting it rest right now but definitely looks tasty. I’m doing for lunch prep. Will add rice & veggies.
Hope you enjoy Monique, thanks for trying the recipe! 🙂
I tried this recipe tonight. I was being very adventurous. At age 67 I had never used paprika. I followed the recipe except I only used 1/2 tsp. of the salt. My husband recently had a heart attack so I have been looking for low sodium recipes. I loved the chicken. My husband thought it was too spicy. The paprika I used was smoked paprika. Is that spicier than plain paprika? Would it taste ok to decrease the paprika? We love making wraps with lots of vegies and this chicken will be an amazing addition. Thank you so much.
Hi Vickie! Yes smoked paprika is spicier. I’d recommend using just regular paprika! 🙂
This was absolutely fantastic! Made it exactly as outlined. Thank you for this wonderful recipe (and the for the tips and suggestions). Can’t wait to try some of your other recipes.
Hi Tracy! Not paid to say this at all, but you won’t regret trying her other recipes. Most of our dinners come from Erica’s website and her ebooks. The ebooks are awesome because she gives you a grocery list for the whole week. It makes life so much easier. Can’t recommend these recipes enough. I tell all my friends and family! So thankful for this delicious corner of the internet.
Was super easy and yummy!