

Dry Brined Spatchcock Turkey (a faster way to roast the perfect turkey)
A dry-brined spatchcock turkey is your secret to the juiciest, crispiest, most flavorful bird for Thanksgiving, Friendsgiving or any holiday gathering. The combo of dry brining and spatchcocking results in a turkey that cooks evenly and quickly, with golden, crispy skin and tender meat. Plus, the dry brine brings TONS of flavor with fresh rosemary, thyme, sage and plenty of citrus zest.
If this is your first time cooking a whole turkey or trying the spatchcock (aka butterfly) method, don’t worry! Consider this your ultimate guide. I’m walking you through every step with detailed, easy-to-follow instructions so you can make it with confidence. And once you do it this way, you’ll never go back!

FEATURED COMMENT
“Admittedly turkey is usually my least favorite part of thanksgiving dinner. Turkey is usually so dry and flavorless. This recipe is a game changer. It makes the moistest, most flavorful turkey I’ve ever had. My whole family raved about it.”
★★★★★

It will come as no surprise that I have always loved Thanksgiving.
Aka Turkey Day. I mean, a holiday centered around food!? Sign me up! Growing up, I always wanted to help with the apple pie but never ventured into any of the savory dishes my mom would make. Then, when Ka-La and I moved into our own house in my early twenties, and as I was learning how to cook, I decided, ‘I’m hosting Thanksgiving this year!’ and invited my parents and sister to Spokane for the holiday. I was 22 then and have made Thanksgiving dinner ever since.
The first time I made a Thanksgiving turkey, I did it the way my mom always did- roasting the whole turkey with the stuffing actually ‘stuffed’ inside. Which we now know is a food-borne illness nightmare lol, but hey that’s how they did it in the old days.
The following year, I saw the cover of Bon Appétit magazine advertising ‘the best Thanksgiving turkey you’ll ever eat.’ I immediately purchased because obviouslyyyy I want all of the secrets. The cover said something about using the ‘spatchcock method’ and I was like umm.. spatch…what? 😆 Don’t ask me where on earth that name came from. Wait I’ll go ask Google real quick…
What does spatchcocking mean?
The term “spatchcocking” likely originates from the phrase “dispatching the cock,” referring to preparing a bird for cooking by splitting it open. Over time, this was shortened to “spatchcock.” It describes the technique of removing the backbone of a bird and flattening it for quicker, more even cooking.
Alright, so why spatchcock?
Fact: All parts of the turkey have to reach 165°F in order to be safe to eat. Generally, the thighs/dark meat take longer to cook than the breast meat.
Problem: When you roast a whole turkey, it cooks unevenly. The breast meat cooks faster and can dry out while waiting for the darker thigh and leg meat to reach 165°F. This happens because the white meat is leaner, while the dark meat contains more fat and connective tissue, which takes longer to cook.
Solution: Removing the backbone and flattening the turkey (aka spatchcocking) drastically reduces the cooking time needed for the turkey to reach 165° F. The dark meat and breast meat cook evenly, coming to temp at roughly the same time, avoiding overcooking. Not only that but spatchcocking creates more surface area for crispy skin! The result is tender, juicy meat that isn’t dried out from overcooking.
Turns out Bon Appétit was right, this IS the best way to make a turkey and I’m never going back.
Brine thoughts
Wet brine? Dry brine? No brine? I’ve played around with all of these, and although it’s controversial, I feel strongly that a simple dry brine is the way to go. It’s lower maintenance than wet brining, doesn’t require you to have a vessel big enough to soak a whole turkey for an entire day but provides the same result.
What is a dry brine and why do it?
A dry brine is a seasoning method that involves rubbing salt, and sometimes herbs, citrus and/or spices directly onto meat to enhance flavor, retain moisture, and tenderize without using liquid. This method draws out the meat’s natural juices, which then dissolve the salt and seasonings and are reabsorbed, deeply seasoning and tenderizing the meat while enhancing juiciness.
It sounds like you’re just salting the turkey, what’s the difference?
Dry brining is more of a deliberate process where a slightly excessive amount of salt is pressed into the turkey skin and left on for at least 6 hours and up to 48 hours. My dry brine recipe combines salt, citrus zest, a little brown sugar and fresh herbs for a truly delicious turkey.
Cooking thoughts
Cooking time will vary slightly based on the size of your turkey. The cooking process starts with the oven at high heat to get a jump start on crisping up the skin and then the heat is lowered for the remainder of the roasting time. My 14-pound turkey took exactly 80 minutes to cook using a convection oven but cook time could fall anywhere between 80-95 minutes or longer if you’re using a larger turkey. The most important thing is to use an instant-read thermometer and remove the turkey from the oven as soon as the deepest part of the thigh reaches an internal temperature of 165°F.
Alright now that we’ve established the extreme merits of dry brining and spatchcocking you’re probably thinking, okay but howwww… I’m scurred. 🫣 Don’t be. It seems a little intimidating but trust me, most of the work is done 1-2 days before the ‘big meal’ so there’s no hustling or fretting on Thanksgiving day. PLUS a spatchcocked turkey cooks much faster and is easier to carve, saving you time when it counts.
So- a little work upfront, a great reward at the end. I’m going to walk you through every single step so you can do it with confidence! Best turkey ever lessss gooooo!

Ingredients You’ll Need to Make Dry Brined Spatchcock Turkey:
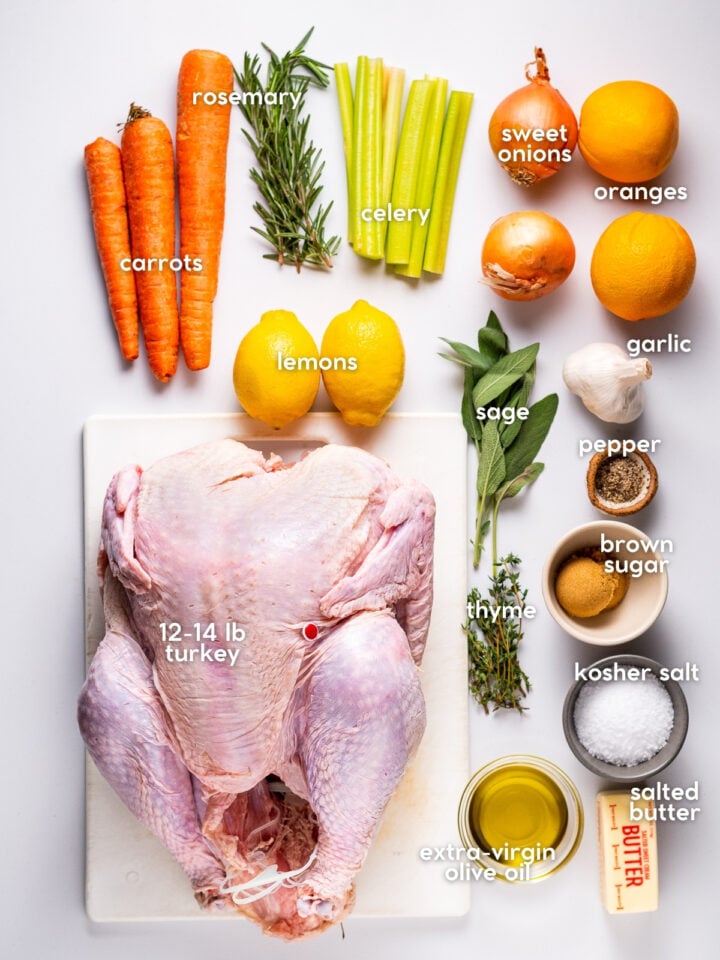
- Dry brine: Kosher salt, brown sugar, orange zest, rosemary, thyme and sage. The salt is essential for drawing out moisture and infusing flavor from the fresh herbs and citrus, while the sugar adds a hint of sweetness to balance it out.
- Turkey: I usually get a frozen turkey, but of course, you could use fresh. Don’t get too large of a turkey, or spatchcocking will be difficult. A 12-14 pound turkey is the perfect size.
- Mirepoix veggies: Carrots, celery and sweet onions roast under the turkey and help create flavorful drippings that make an awesome gravy.
- Garlic: Use whole heads of garlic sliced in half lengthwise or smashed garlic cloves.
- Citrus: We place fresh orange and lemon slices beneath the turkey as it roasts to enhance the flavor. We also infuse the olive oil/butter mixture with citrus zest for basting.
- Olive oil + butter: Used for basting the dry brined spatchcock turkey to help create golden, crispy skin while adding rich flavor.
Equipment You’ll Need to Spatchcock a Turkey:
How to Make Dry Brined Spatchcock Turkey:
Make the dry brine: Add the kosher salt, brown sugar, orange zest, black pepper, rosemary, thyme and sage leaves to a food processor and pulse for 10-15 seconds until combined. Save the herb stems for your turkey stock! If you don’t have a food processor, finely chop the herbs with a sharp knife or spice grinder and mix everything together in a small bowl.


Prep the turkey: Remove the turkey neck and giblets and set them aside on a rimmed baking sheet for turkey stock. Pat the turkey dry with paper towels and place it breast side down (backbone up) on a large cutting board.


Remove the backbone: Feel along the center of the back to identify both sides of the backbone. Starting at the tail end, use sharp kitchen shears to cut along one side of the backbone, applying steady pressure to cut through the ribs up to the neck. The cuts near the neck can be tough—get some leverage and use your muscles! You got this. Repeat on the opposite side to fully remove the backbone and place it on the sheet pan with the neck and giblets.


Flatten it: Score the breastbone with a sharp knife, then flip the turkey breast side up. Press firmly on the center of the breast with the heel of your hands until you hear it crack and the turkey lays flat.


Dry brine: Trim any excess fat or skin, then rub the dry brine mixture all over both sides of the turkey, pressing so it sticks. Place the turkey on a rack in a roasting pan and refrigerate uncovered for at least 6 hours (up to 48 hours).


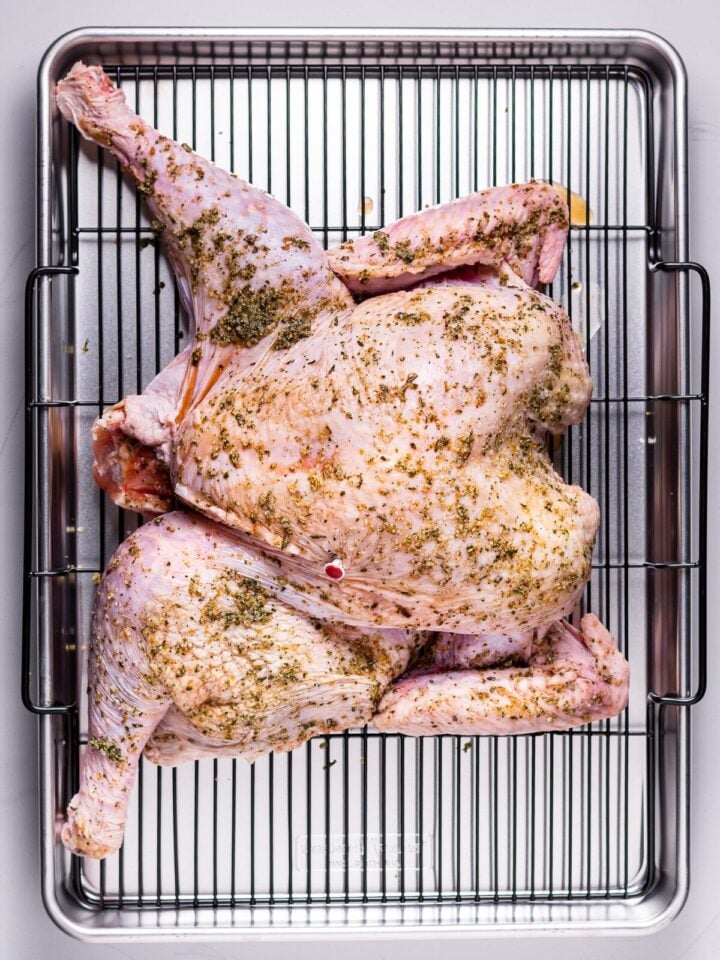
Cooking prep: Use paper towels to pat off any excess dry brine, but don’t rinse. You want the surface of the turkey to be mostly free of excess brine and as dry as possible. Let the turkey sit at room temperature for 30 minutes. Position the oven rack in the middle or lower middle of the oven and preheat to 450°F (232°C). Use the convection bake setting if available.
Make the herb and citrus oil: In a skillet, warm the olive oil and butter over low heat. Add the orange and lemon zest strips, rosemary and thyme and let it infuse for a few minutes. Keep warm.
Prep the roasting pan: Slice the onions, carrots, celery, garlic, lemon and orange (the ones you took the zest strips from) and place them in an even layer in the roasting pan.

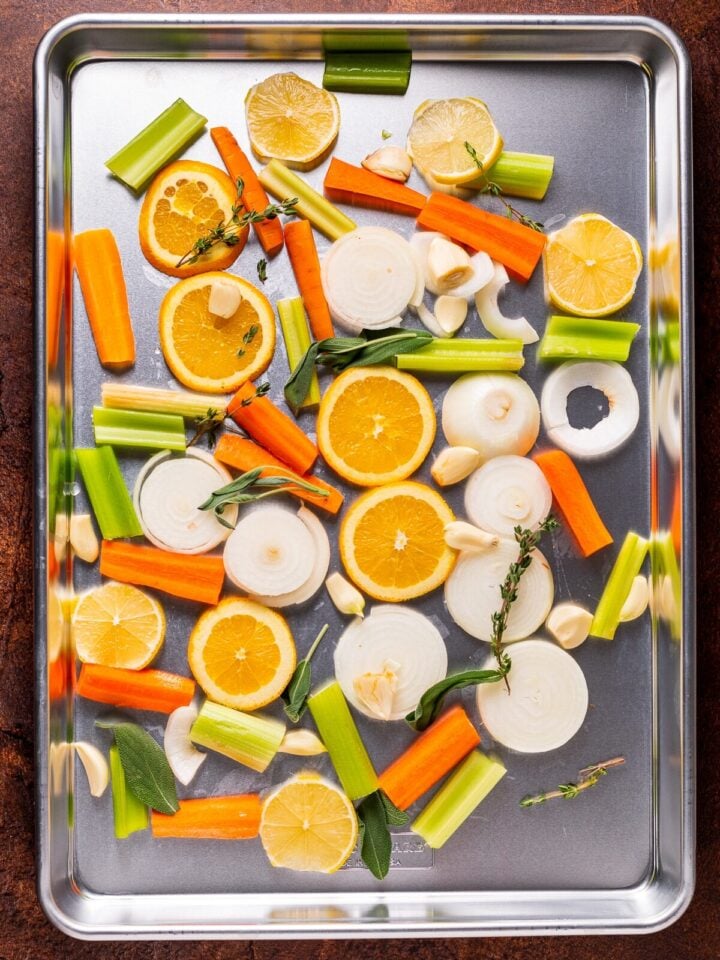
Baste the turkey: Place the dry brined spatchcock turkey (breast side up) on top of the veggies. Tuck the wings underneath and add about ¾ cup water to the pan to keep the vegetables from scorching. Brush the outside of the turkey with ¼ of the infused oil.


Roast the turkey: Roast for 20 minutes at 450°F. Reduce the oven temperature to 350°F (177°C) and continue roasting for another 60-80 minutes. Every 20 minutes, brush the skin of the turkey with oil and pan juices. Start checking the temperature around the 80-minute mark. The turkey is done when an instant-read thermometer inserted into the thickest part of the thigh and breast reaches 165°F (65°C). The skin should be deep golden brown and crispy.
Since every oven is different, cooking time will vary between 80-100 minutes total for a 12-14 pound spatchcocked turkey.


Carve turkey meat: Transfer the turkey (breast side up) to a cutting board and tent loosely with aluminum foil. Let rest for 30 minutes before carving. At this point, you can make your turkey gravy.
Legs and thighs: Locate the leg joint where the thigh connects to the body. Cut through the skin between the leg and the body, exposing the joint. Use your hands or knife to pop the joint out of its socket. Slice through to remove the entire leg. Separate the drumstick from the thigh by cutting through the joint between the two.
Thigh Meat: Slide the tip of your knife under the meat of the thigh, working your way along the bone. As you do this, use your fingers to pull the meat away from the bone. Continue cutting and pulling the meat away from the bone until the entire thigh is entirely boneless. Slice it into thin pieces.


Wings: Locate the joint where each wing attaches to the body. Pull the wing outward and cut through the joint to remove it.
Breast: Start at the center of the turkey, where the breastbone runs along the middle. Slice down one side of the breastbone, following the curve of the rib cage, to remove the whole breast.


Place the turkey breast on the cutting board and slice it crosswise into even pieces.


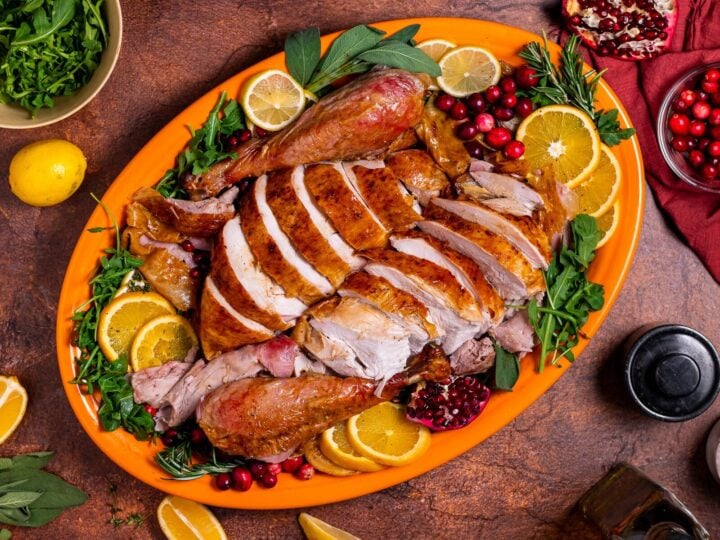
Arrange turkey pieces on a large serving platter. Garnish with lemon slices, fresh thyme, rosemary sprigs, arugula, cranberries, etc. Serve with your favorite Thanksgiving sides. I shared some of my favorites below!


Thanksgiving side dishes to serve with your dry brined spatchcock turkey:
Roasted Garlic Mashed Potatoes
Really Incredible Turkey Gravy
Perfect Lemon Butter Green Beans
Roasted Sweet Potatoes and Carrots with Crispy Sage Butter
Hot Honey Roasted Brussels Sprouts
Arugula Burrata Salad with Delicata Squash and Pomegranate
Honey Roasted Vegetables with Miso and Walnuts
Kale and Spinach Salad with Apples and Balsamic Fig Dressing


Expert Tips to Ensure the Best Dry Brined Spatchcock Turkey:
- Use the turkey backbone, neck, and giblets to make flavorful turkey stock, which you can then use to make gravy and stuffing.
- Make sure your turkey is fully thawed before attempting to spatchcock it.
- Don’t rinse off the dry brine. Simply pat off any excess with paper towels. Don’t worry, it won’t be too salty.
- Leave the turkey uncovered in the fridge during the brining process to help dry out the skin for extra crispiness.
- Use convection bake when roasting your turkey if you have a convection oven.
- Don’t you dare toss the drippings. There should be about ¾ cup of turkey drippings when it is finished roasting. Scoop out the veggies/citrus on the bottom of the roasting pan and add them to a stockpot to make turkey broth with the carcass. Then place the turkey drippings in a fat separator or a liquid measuring cup and let the turkey fat separate from the turkey drippings.
- Use a meat thermometer! You cannot rely solely on the times listed in my recipe because all ovens are different. Insert the meat thermometer at the 80-minute mark and then watch closely for it to reach 165 degrees F.
- Let the turkey rest. Resting allows the juices to redistribute evenly throughout the meat, preventing them from running out when you carve the turkey. If you skip this step, you risk a dry turkey and losing all those delicious, flavorful juices. Additionally, resting helps the turkey cool slightly, making it easier and safer to carve.

Are you ready to make the PERFECT TURKEY!?
FAQs
I got you! Full tutorial and recipe right here. And then use the turkey stock to make turkey gravy!
You should brine the turkey, uncovered, for at LEAST 6 hours, but 24-48 hours is ideal for maximum flavor.
Make homemade turkey broth! You can follow the same recipe for my make-ahead turkey stock, but instead of the giblets and backbone, you’ll use the carcass. You can also use the veggies that sit underneath the turkey while roasting.
Place the turkey, still in its original packaging, on a tray or in a shallow pan to catch any drips. Keep in the fridge until thawed. A good rule of thumb is that it will take 24 hours per 4-5lb of turkey. So if you have a 12-14lb turkey, it’ll take about 2 ½-3 days to thaw in the fridge.
Yep! You can use a large aluminum disposable roasting pan. I’d recommend grabbing two and use one for refrigerating the dry-brined turkey and a clean one for roasting the turkey. Less cleanup that way!
You can. But it does get more difficult to spatchcock when you have a big bird. Get a good pair of poultry shears and step up on a stool to get leverage over the turkey if you need to. You’ll need to adjust the cooking time too. A general rule of thumb is that the cook time for a spatchcocked turkey is about 6 minutes per pound. So, if you have a 20lb turkey, that’ll be around 120 minutes, or two hours.
Absolutely! This dry brine and spatchcocking method works wonderfully for whole chickens. You’ll want to halve the dry brine amount and adjust your cooking time.
Watch How to Make Dry Brined Spatchcock Turkey:
If you try and like this recipe, please don’t forget to leave a comment and star rating down below! For more lifestyle, behind-the-scenes and ‘eating in real life’ type of content, come find me over on Instagram, TikTok, Pinterest, Facebook, or Youtube – I love connecting with you all there!
Print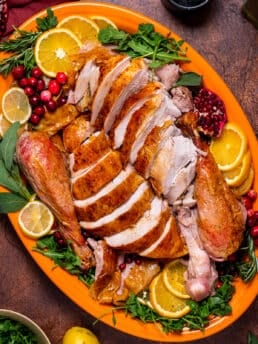
Dry Brined Spatchcock Turkey (Faster Roasting Method!)
- Prep Time: 1 hour + 24 hours to dry brine
- Cook Time: 80-95 minutes
- Total Time: 2 hours 20 minutes + 24 hours to brine
- Yield: 12-14 servings
- Category: Entertaining, Main Dish
- Method: Brine + Roast
- Cuisine: American
- Diet: Gluten Free, High-Protein
Description
I cannot wait for you to use this foolproof method to make the juiciest, most flavorful roast turkey! Once you make this dry-brined spatchcock turkey, you’ll never go back.
Ingredients
Dry Brine
- ⅓ cup kosher salt
- 2 tablespoons brown sugar
- zest of 1 whole orange
- 2 teaspoons freshly ground black pepper
- 4 sprigs fresh rosemary, leaves removed
- 8 sprigs thyme, leaves removed
- 8 sprigs sage, leaves removed
Turkey
- 1 12-14lb turkey
- 2 sweet onions, peeled and cut into thick slices
- 3 large carrots, peeled and cut into 3-inch pieces
- 4 celery stalks, cut into 3-inch pieces
- 2 heads garlic, sliced in half lengthwise
- 1 orange, sliced
- 1 lemon, sliced
Herb and Citrus Oil
- ½ cup extra virgin olive oil
- ¼ cup salted butter
- 4 strips of orange zest
- 4 strips of lemon zest
- 1 sprig rosemary
- 1 sprig thyme
Instructions
Make the dry brine:
- Place the kosher salt, brown sugar, orange zest and black pepper in a food processor. Pluck the leaves from the rosemary, thyme and sage and add them to the food processor. Save the stems to add to your turkey stock! Process for 10-15 seconds until the mixture is well-combined. If you don’t have a food processor, finely chop the herbs with a sharp knife or spice grinder and mix everything together in a small bowl.
Spatchcock the turkey:
- Set up: You will need paper towels or an old towel, cutting board, sharp knife, and a good pair of poultry shears. Remove the turkey neck and giblets and place on a sheet pan (we’re using them for our roasted turkey stock). Pat the turkey dry with paper towels and place it on the cutting board breast side down, backbone up. (aka, upside down).
- Cut along one side of the backbone: Feel along the center of the back to identify the firm ridge of the backbone running between the two sides of the bird. Using poultry shears, start at the tail end and carefully cut along one side of the backbone. Use firm, steady pressure to cut through the ribs, working your way up to the neck. The final cut on the neck side of the bird is usually the toughest because you’re cutting through tough bone and cartilage near the neck. Use your muscles, you got this!
- Cut along the other side: Repeat on the opposite side of the backbone to fully remove it. Set the backbone on the sheet pan with the neck and giblets, for the stock, if making.
- Score the breast bone: Use a sharp knife to score down long oblong bone in the center of breast.
- Flatten the turkey: Flip the turkey so it is breast side up. Press firmly down on the breastbone with both hands to flatten the bird. You will hear a crack as the breastbone breaks. You did it!
- Apply dry brine: If you encounter any excess pieces of fat or skin you can trim those away with kitchen scissors or shears. Press the dry brine mixture all over both sides of the turkey, pressing firmly so the mixture adheres to the skin.
- Refrigerate: Place the turkey on a roasting pan with a rack. If you don’t have a roasting pan, you can use a disposable aluminum roasting pan. Refrigerate the brined turkey, uncovered, for at least 6 hours, but up to 48 hours.
Cook the turkey:
- Prep: Use paper towels to brush/pat off any excess dry brine, but don’t rinse. You want the surface of the turkey to be free of excess brine and as dry as possible. Let the turkey sit at room temperature for 30 minutes.
- Preheat the oven: Arrange the rack to the middle or lower middle part of the oven. Preheat oven to 450ºF (232ºC). If you have a convection oven make sure it is set to convection bake.
- Make the herb and citrus oil: Gently warm the oil and butter in a small skillet over low heat. Add the orange and lemon strips, rosemary and thyme and let the aromatics infuse the oil for a few minutes. Keep warm.
- Prep the roasting pan: Place sliced onions, carrots, celery, garlic, lemon and orange in a large roasting pan. I use the lemon and orange that I took the zest strips from. Place the turkey breast side up directly on top of the veggies. Tuck the turkey wings under its body so they don’t burn in the oven. Add about ¾ cup water to the bottom of the pan so the veggies don’t scorch.
- Baste and cook: Use a pastry brush to brush about ¼ of the flavored oil over the entire surface of the turkey. Roast for 20 minutes at 450ºF. Reduce the temperature to 350ºF. Slide the rack out slightly and brush again all over with oil. Roast for another 60-80 minutes, brushing with oil and pan juices every 20 minutes, until an instant-read thermometer inserted into the deepest part of the turkey thigh registers 165°F (65°C). Remove turkey immediately and place on a large cutting board. Tent with foil and let rest for 30 minutes. Make turkey gravy while you’re letting the turkey rest.
- Notes on cook time: My 14-pound turkey took exactly 80 minutes using a convection oven. Spatchcocked turkeys cook faster than whole turkeys, usually around 6-8 minutes per pound. However, all ovens are different, and convection ovens will cook quicker than conventional ovens. I suggest inserting the meat thermometer at the 80-minute mark and then watching the turkey closely until it hits 165ºF exactly. Total cook time will range from 80-95 minutes for a 12-14lb turkey.
Carve the turkey:
- Legs and thighs: Place turkey breast side up on a cutting board. Locate the leg joint where the thigh connects to the body. Cut through the skin between the leg and the body, exposing the joint. Use your hands or the knife to pop the joint out of its socket. Slice through to remove the entire leg. Separate the drumstick from the thigh by cutting at the joint.
- Thigh Meat: Slide the tip of your knife under the meat of the thigh, working your way along the bone. As you do this, use your fingers to pull the meat away from the bone. Continue cutting and pulling the meat away from the bone until the entire thigh is fully boneless. Slice it into thin pieces.
- Wings: Locate the joint where each wing attaches to the body. Pull the wing outward and cut through the joint to remove it.
- Breast: Start at the center of the turkey, where the breastbone runs along the middle. Slice down one side of the breastbone, following the curve of the rib cage, to remove the whole breast. Place the breast on the cutting board and slice it crosswise into even pieces.
Serve the turkey:
- Neatly arrange the breast slices, drumsticks, thigh meat, and wings on a serving platter. Garnish with lemon and orange slices, arugula, fresh herbs and cranberries if you’re fancy like that. Serve warm with turkey gravy and get ready to WOW your guests with this showstopper!
Notes
I have lotsssss of thoughts and advice on how to nail this turkey every.single.time. Refer to the above blog post for expert tips, step-by-step photos, answers to frequently asked questions and more.
Here are easy links to my recipes for turkey stock and turkey gravy.
Click here to see a list of my favorite Thanksgiving side dishes.
Would you like to save this?
Nutrition
- Serving Size: 8oz cooked turkey
- Calories: 302
- Sugar: 1.6 g
- Sodium: 226.2 mg
- Fat: 14.2 g
- Carbohydrates: 3.1 g
- Fiber: 0.8 g
- Protein: 39 g
- Cholesterol: 128.6 mg


Admittedly turkey is usually my least favorite part of thanksgiving dinner. Turkey is usually so dry and flavorless. This recipe is a game changer. It makes the moistest, most flavorful turkey I’ve ever had. My whole family raved about it.
YAAAAYYY ALLISON!!!! Love love love this, thank you for making it and trusting my recipe!
Do you have a good green bean recipe of some sort to pair with turkey?
I do, I actually just posted it! https://flavorfulife.com/lemon-butter-green-beans/
If attempting this with a 20 lb turkey would you double the brine and mirepoix? Oil too?
Yep, you could either do 1.5x or 2x the recipe and it would work out well! (brine and oil would be the most important parts to double), you could get away with any amount of veggies on the bottom of the pan.
Any suggestions for smoking a turkey using your prep method? I’d like to use this recipe this year but my husband wants to smoke it and I’m scared! Halp!
Oh man, I don’t have a smoker! So I’m unsure on exact logistics there. My hypothesis would be that you could spatchcock, brine and prep the turkey per the recipe and then just pop it in the smoker! I’d follow the directions on the smoker for cook times and use a meat thermometer 🙂
Hi!! I would love to know what size of disposable roasting pan would work for this recipe! I’d love to try it out this Thanksgiving before investing in a pan specifically for it. 😊 if you could provide me with what size of disposable one to get, I would be very grateful! And also, would you need to put some kind of wire rack in the bottom of the disposable roasting pan still? I look forward to hearing from you!!
Hey Stephanie! The size of pan you need will depend a little bit on your turkey size. For a 13-14lb turkey, I’d go for a 20-inch disposable roasting pan. And no you don’t need a rack, simply place your turkey right on top of the layer of celery/onion/carrot!
Can I add a bit of rub under the skin with compound butter?
Yes, but I’d wait to do that until right before roasting! Also don’t add too much or it’ll be really salty.
Can you do this with a chicken?
Yes! You’ll need to adjust the cook time (it will be less, refer to my cook time per pound for a good estimate).
My first time hosting my family for thanksgiving and I used your brining recipe (and spatchcocked) and the Turkey was a success and the gravy was the best I’ve ever had. It was a hit with the family. 🥹 THANK YOU!
PS…. I appreciate that the recipe was very user friendly 🥰
Yaaaay!! I’m so glad it was a hit, thank you for your review Kali!!